
As much fun as it is to quickly whip up an unlined skirt, there are times that you need a lining. Maybe the fabric is too itchy, too clingy, or just too sheer. We want your fabric options for Betsy to be wide open, so today I'm showing you how to draft your own lining. I'll be covering views A and C, since drafting is needed to deal with the vents. There will also be a bonus tutorial on attaching the lining to the vent in view A.
Before drafting your lining, you'll want to muslin Betsy and make any fitting changes you need. That way you don't have to do fitting work twice. For example my sample skirt has a size 12 waist and a size 14 hip. I've also changed the top of the skirt vent to be a diagonal instead of a square. That's my own personal preference, but will not change the instructions in any way. OK then, let's start drafting.
Betsy View A
When you sew a regular vent on an unlined skirt, the vent is made by folding the fabric and top-stitching the top of the vent. When you add a lining to the skirt this changes. The vent is made by cutting one side of the vent lining smaller, so that it pulls the fabric underneath and creates the folded edge. The skirt no long needs the top-stitching because the lining holds the vent in place.
Drafting steps
Step 1 - Trace copies of the front and back skirt pieces of view A.
Step 2 - On both the front and back pieces, shorten the length by an 1". This will keep the lining from peeking out of the hem line.

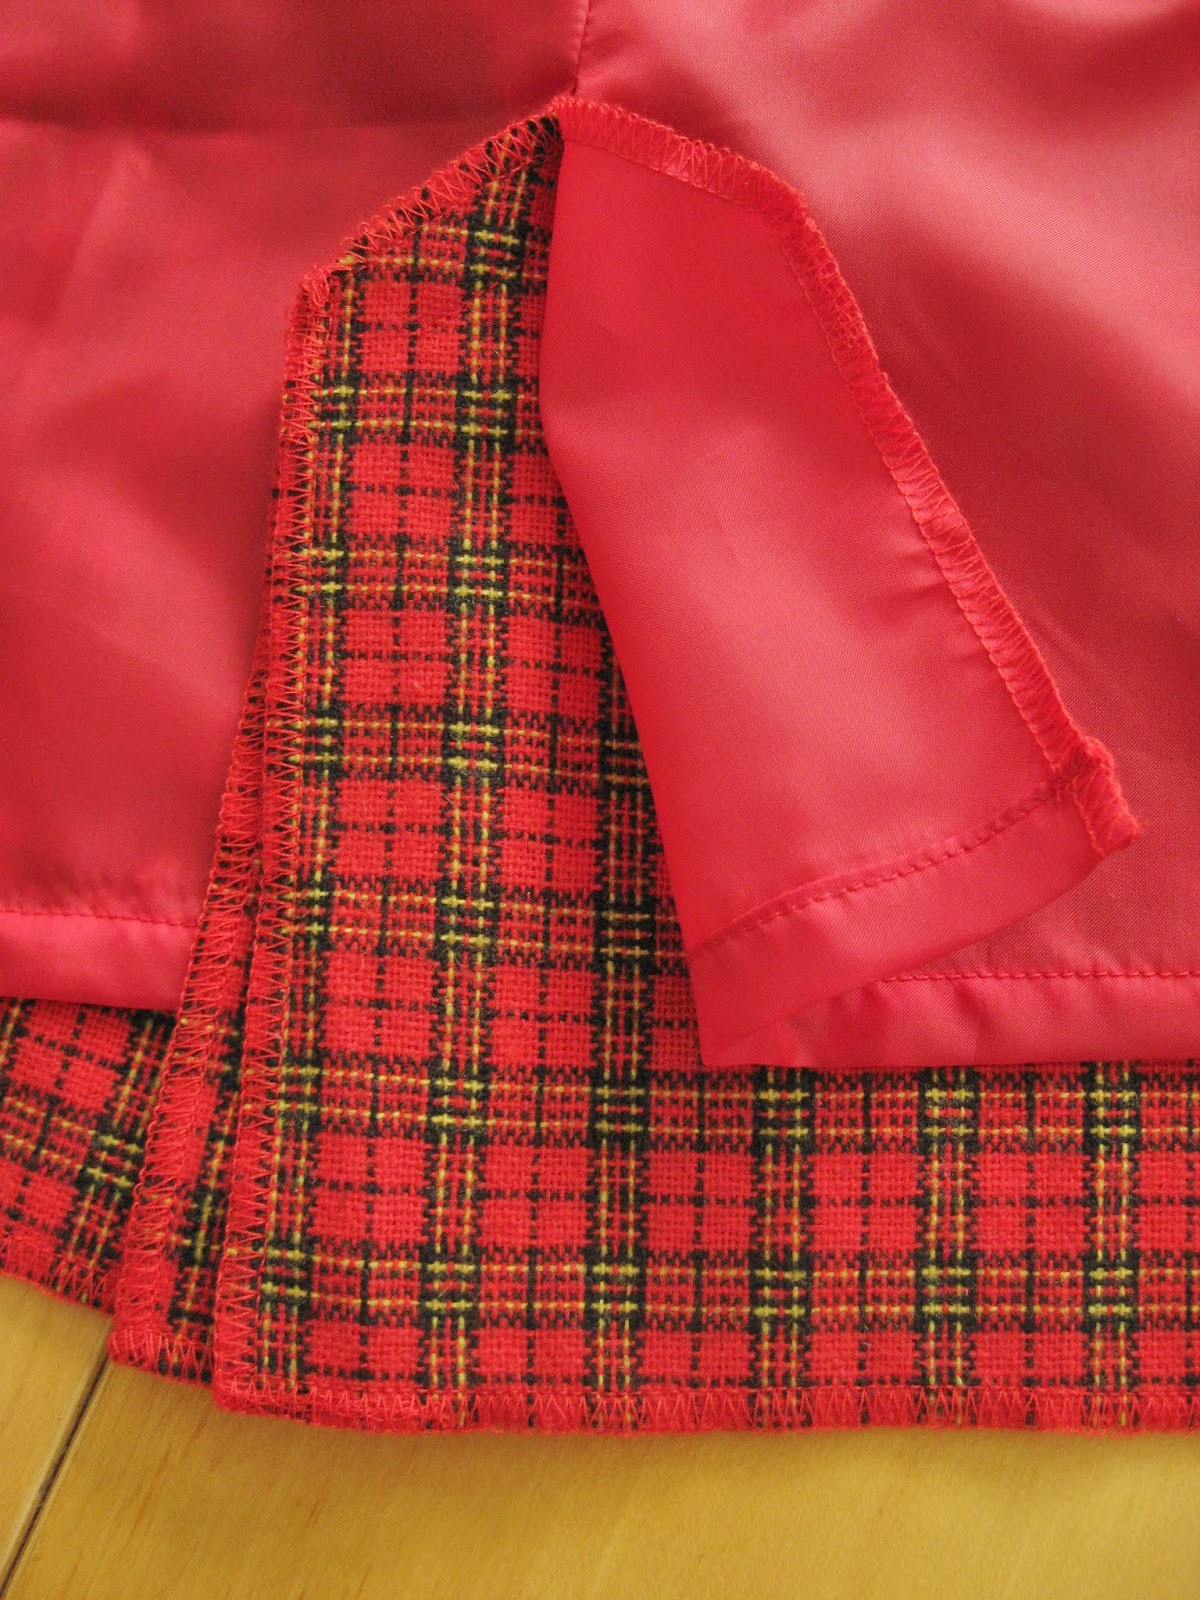
Step 3 - On the back lining the right side will have a regular vent extension and the left side will have a cut out to pull the self fabric vent under. We need to draft the cutting line for the left side. To start extend the CB line down through the vent.

Step 4 - Fold the vent extension towards the skirt on the line that was just drawn.

Step 5 - Trace the vertical line of the vent on the skirt and unfold the vent extension.

Step 6 - The top of the lining vent needs to be drawn 1/2" lower than the original. Place marks 1/2 lower on both the CB seam and the traced vertical vent line.

Step 7 - Using your new marks, draw in the top of the lining vent.

Step 8 - Label this line "cut left side only". When you cut your lining, cut two pieces. Go back and use this line to cut the extension off on the left piece. (P.S. - The right side of the fabric is facing me when I choose which piece is the left back.)

How to sew the lining to the vent
Prep - On both the self and lining fabric, sew darts and side seams. Finish the seams and press them open. Hem the lining fabric to it's finished length, the self fabric remains un-hemmed. I've done a simple double turn and machine stitch for my lining finish.

Step 1 - Starting with the self fabric, sew the CB seam from the zipper notch to the top of the vent. Stop sewing 5/8" away from the edge of the vent. We will be attaching the lining to the vent edges, so the seam allowance must remain free. Press the seam open.

Step 2 - Take the lining and sew the CB seam from the zipper notch down to the vent circle mark. Press the seam open.

Step 3 - Wrong sides together, baste the lining to the self fabric at the waist.

Step 4 - Now we will sew the vent edges together. Turn the skirt inside out so that you are looking at the right side of the lining. To make sure the lining doesn't get bunched up during the process, pin the lining to the self fabric at the zipper notch and then a little further down.

Step 5 - The side with the underlap is getting sewn first. On Betsy that will be the right side of the vent when the skirt is inside out.
Step 6 - Take the lining vent extension and flip it over so that the right side of the lining faces the right side of the self fabric.

Step 7 - Pin the two fabrics together matching up the top angle of the vent. You need to leave the seam allowance for the top of the vent free to sew later, so mark 5/8" down from the edge. I've put a pin right at the point I'm supposed to start sewing.

Step 8 - Stitch the seam. Start 5/8" down from the top of the vent, and stitch down to the hemmed edge of the lining.


Step 9 - Time to sew the other side of the vent. Once again flip the lining over so that the two right sides face each other. On this side I measure up from the bottom of the self fabric for placement of the lining. This makes sure the hem edge starts at the same height on both sides.


Step 10 - Stitch the seam like on the other side of the vent.


Step 11 - Pull the lining out of the skirt so that the vents look like this. We'll be sewing the top of the lining vent now.

Step 12 - Clip the lining at the angle so that it lays flat. You can also clip on the other side near the self fabric if the lining is puckering.

Step 13 - Pin both sides of the lining together at the top of the vent.

Step 14 - Sew the seam, from the CB seam to the seam that attached the lining to the self fabric.

Step 15 - Turn the skirt right side out. The cut out on the left side of the lining will pull the self fabric under giving you a proper vent. Press the self fabric so that the vent edges are nice and crisp.


Betsy View C
Since the pleated kick pleat is fully enclosed, you have two options when drafting a lining for view C. The lining can have either a regular kick pleat or a slit with finished edges. I'll show you how to do both.
Drafting - Regular kick pleat
Step 1 - Trace copies of the front and back skirt pieces of view C.
Step 2 - On both the front and back pieces, shorten the length by an 1". This will keep the lining from peeking out of the hem line.
Step 3 - Extend the CB line down through the vent.

Step 4 - Straighten the bottom of the hem line so that it is at a 90 degree angle to the CB and vertical vent lines.

Step 5 - Draw a line parallel to the CB about 2" away.

Step 6 - Redraw the top of the vent so that it 45 degree angle, or close to it.

Step 7 - The newly drafted vent can be cut out now and the lining pattern is ready to be used.
Sewing Notes - Regular kick pleat
Step 1 - Sew the CB of the lining from the zipper notch down to the circle vent marking.
Step 2 - Baste the lining to the waist of the skirt, wrong sides together.
Step 3 - Use the vent sewing instructions for View A of the Betsy skirt to complete the rest of the lining.
Drafting - Finished Slit
Step 1 - Trace copies of the front and back skirt pieces of view C.Step 2 - On both the front and back pieces, shorten the length by an 1". This will keep the lining from peeking out of the hem line.
Step 3 - Extend the CB line down through the vent.
Step 4 - Straighten the bottom of the hem line so that it is at a 90 degree angle to the CB and vertical vent lines.
Step 5 - Cut the entire vent extension off along the extended CB line.

Sewing Notes- Finished Slit
Step 1 - Sew the CB of the lining from the zipper notch down to the circle vent marking.
Step 2 - Clip the seam at the circle vent marking.
Step 3 - Fold the seam allowance under to create a narrow edge finish and stitch down.
Step 4 - Baste the lining to the waist of the skirt, wrong sides together
There you go, now you're all prepared for some luxuriously lined skirts. Just remember to pre-wash your lining, just like you do with self fabric.
Happy Sewing!
Heather
No comments
Post a Comment
Thank you so much for the visit and leaving a comment!
I totally appreciate them all!
Happy sewing!
Abby
x