Monday 31 March 2014

The Winifred sew-along # 8 - Attach the slide belt buckle & hemming


Woo hoo lovely sew-alonger's today is the final post for the Winifred sew-along! I'm so excited to get to the fun part of seeing all of your gorgeous Winifred dresses all sewn up and being worn with pride.. and of course have a bit of a drool over all the amazing fabric that's been chosen. I've had some sneaky peeks of so far and there are some AMAZING Winifred dresses coming along.


Before we begin,  i kindly put ALL the Winifred sew-along post in the one, little handy spot for you all so you don't have to waste valuable sewing time trying to find the info you need. 


 So let's get started for the last time together and finish our Winifred dresses! Yay!


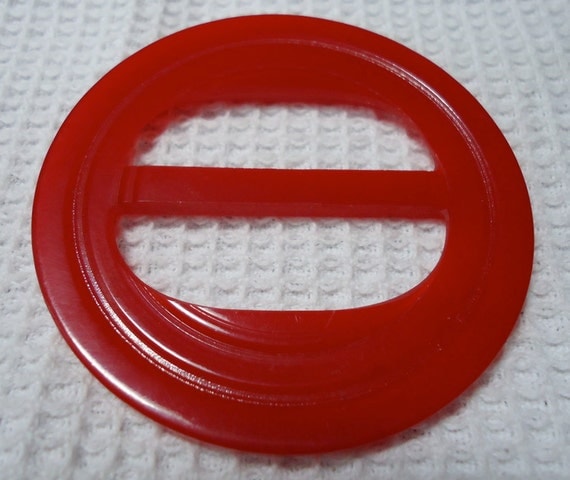
First up we will begin with attaching the slide belt buckle, which is super easy and looks cute than cuter when all sewn on.

ATTACH THE SLIDE BUCKLE


 Slip the end of the left belt over the buckle's middle bar and fold the excess fabric over approx 2'' past the centre bar. 


Temporarily just pin in place for the moment.


To make sure the slide buckle sits in the perfect center position when wearing your Winifred dress, check the position before sewing it down. Try on your Winifred dress and position the buckle so that its  in line with the center back seam ( You may need a helping hand with this). Then pin it in place.


  Stitch the slide buckle in place and make sure to back stitch to keep it secure.


Slip the right belt through the slide buckle over the middle bar and back under and your belt is complete! Optional: You can add some snap on's to hold the belt end in place if you desire.


I have recommended a 2'' slide buckle, but there is no issue in going a tad bigger with the size of the slide buckle for more effect on the back of the dress or even making your belt tabs a little smaller in width so you can fit it into your perfect slide buckle.


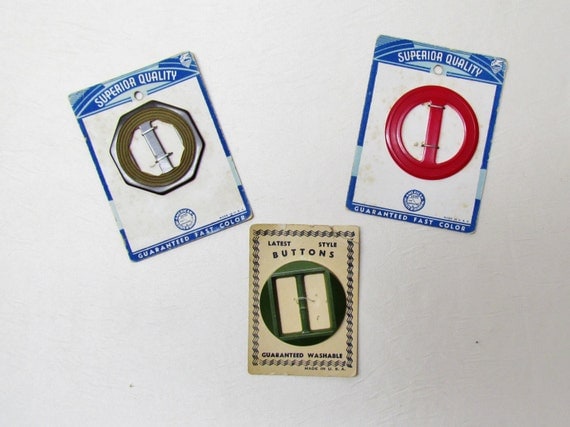
 I've also been asked where are the best places to start in the search for a slide belt buckle and a few places you can find really cool slide buckles are on Etsy ( below are a few cool vintage pieces. Ebay also is a good place to have a hunt for them. I have also been told they may be hiding in the button or craft section of your local sewing shop too.


Vintage buckles - lot of 3 slide buckles on original cards, 2 are bakelite, 1930's

1 large Vintage Bakelite scarf holder, ribbon slide.1.15" across.  Red. UNK10.00-12.2-26.1


Cue awesome, excitement music and 'I'm so awesome' dance moves because we are up to the final step... hemming our Winifred dress!

DRESS HEM


Try on your Winifred dress and mark you preferred hem length. The finished hem length of the Winifred dress is roughly 23''.


Fold up 1/2'' on the hem edge to the inside of the dress and press it down. Fold this hem edge up again another 1''  to form the hem. Stitch in place.


Give your Winifred a really good press all over and you're finished!


You now have a gorgeous Winifred dress you have sewn up with your own two hands! You should be extremely proud of yourself! 

If you're still stitching away on your Winifred dresses feel free to continue to ask questions, post in the Facebook sew-along to get yourself the help you need, so you can get yourself a finished Winifred dress too.
 
Just to recap if you're entering the competition to win the awesome prizes, take note of the below dates:

Final date to upload your Winifred photos : 10th of April to the Flickr group.

Make sure to join the Flickr group sooner rather than later, if you're planning on entering the sew-along competition.


 The couple of days following the 10th of April  i will be collating all the entries, getting them  ready to be voted on by you.


Voting will begin : 14th of April and run through to the 20th of April. This is your chance to vote on your favorite Winifred dresses!


Once I've tallied all the votes i will be announcing the 3 winners here on the blog roughly around the 23rd of April.


I can't to see all the Winifred's pop up out there in the wild. I hope you all enjoyed the sew along and especially sewing up the Winifred pattern. I cant thank you all  enough for all the lovely words of support, as well the massive amount of support from all of you for  kindly ordering the pattern,  supporting me in this crazy journey as well as  allowing me to continue doing what i love, designing and creating sewing patterns.  

So I hope you love your Winifred dresses and feel absolutely gorgeous when you wear them!

Abby
x
SHARE:

Sunday 30 March 2014

The Winifred sew-along # 7 - Assemble and attach the belt and hem the sleeves


In today's Winifred sew-along post we're going to keep the full steam ahead sewing going. We are so close to finishing up our Winifred's, with tomorrow being the final post for the sew-along! Woo!


Before we begin, below you can find all the previous posts for the sew-along so far:
 
So let's start today's post with stitching up the cutest part of the Winifred dress, the belt.


ASSEMBLE THE BELT

1. Right sides together fold each belt section in half lengthwise. Stitch the horizontal open edge of the belt closed, but leave the vertical 'end' of the belt open.  For the right side belt stitch the end following the shape of the belt. For left side of the belt stitch across the end in a straight line where marked.


2. Trim seams on both belt sides and cut off the surplus on the left hand belt side end.


 3.  Turn both belts right side out and give them a good press.


ATTACH THE BELT & DRESS SIDE SEAMS

1. Baste each of the belts to the side edges of the front dress, right sides facing and lining it up with the back elastic waistline. Remember the belt is designed to basically cover the elastic on the back of the dress. Keep in mind too when basting the belts to the dress, right side to right side and left side to left side of the dress for each of the belts.


2. Right sides together and placing the belts into the inside of the dress, pin the dress front (1) to the dress back (2) at the side seams.  Stitch the dress sides seams together in one continuous seam from underarm to hem ( View B stitch the sleeves from the sleeve edge to hem) catching the belt ends ( which are basted into the dress side seams) on the seam. Make sure to keep the rest of the belt clear of the stitching line.


3. Finish the dress side seams and press.


SLEEVE HEMS

Hemming the sleeves applies to both views of the Winifred dress.

1. Hem the sleeves by folding  a 1/4'' then another 1/4'' again, press it down and then  stitching this  folded edge down.


Turn your Winifred dress right side out and you're hitting the final stretch!

Tomorrow's sew-along post we will be finish off our belts and attaching the slide buckle and then all that's left is to hem our Winifred dresses! 

Abby
x


SHARE:

Saturday 29 March 2014

The Winifred sew-along #6 - Front tuck darts centre dress front & shoulder seams


Morning all you fine sew-alonger's! Today's blog post we will be stitching up our front tuck darts, the dress center front seam, shoulder seams and also the collar.

If you're just joining us or  need a refresher below are all the previous Winifred sew-along blog posts:

So let's get started!

FRONT TUCK DARTS

1. On the wrong side of the fabric, create both the tuck darts on the dress (1) by folding the fabric together along the marked lines. Pin in place.
2. Stitch along these marked lines from top top bottom of the dart.


 3. Press the darts flat to form a slight box pleat effect on the inside of the dress and also lightly press them on the right side of the dress.


* Apologies for the crinkles, i actually wore this Winifred to work all day :)


STITCH DRESS FRONT 

1. Right sides together stitch the front center seam of the dress together from the small dot at the neckline to the lower hem edge of the dress.
2. Right sides together stitch the center back seam of the collar together. Trim the collar seam and press open.


Clip the seams at the neckline. Finish seams and press the seam open
 

SHOULDER SEAMS
  1. Right sides together stitch the front and back of the dress together at the shoulder seams up to the collar only. Don't stitch the collar to the back neckline of the dress as yet.


2. Clip the seam close to the collar.


DRESS COLLAR

1. From the inside of the dress ease the neck edge of the collar into the back neck edge of the dress and pin in place. If you have completed Heather's post on adjusting the neckline and collar you can miss the easing into the neck edge part of this step and just pin the collar to the back neck edge and then continue with the upcoming steps.


2. Stitch the neck edge of the collar into the back neck edge of the dress.


3. Clip seams along the neckline.


4. Finish the shoulders seams and neckline seam and press them open. 

 5. Grab your two collar facing pieces (3) and stitch them together at the center back seam. Trim this seam and press open.


6. Place the dress collar and collar facing right sides together. Line up the collar edges, match the  notches and back center seams and pin in place.


7. Stitch the collars together, by stitching around the around edges all the way round. Start from the bottom edge of the collar and simply followthe shape of the collar as you stitch.


8. Clip the seams the entire way round this collar  seam and trim. Finish the raw outer edges of the facing as you desire. I use my over locker or just my pinking shears.


9. Turn the collar facing to the inside of the dress and give your new collar a  good press all over. 


10. Grab a needle and thread and on the inside of the dress tack the collar facing down to the front dress center seam and both of the shoulder seams. Tacking the collar facing will help keep your collar in place and stop it from turning to the outside of the dress.


Tomorrow's post we will assemble our belts, attach them and also hem our sleeves. 
Exciting times peoples, nearly at the finish line!

Happy Winifred sewing and weekend :)

Abby
x
SHARE:

Friday 28 March 2014

The Winifred sew-along #5 - How to add smocking


Today I'm going to show an alternate method to elasticize the back of your Winifred dress. Instead of going the elastic in a casting route, you can use elastic thread to create lines of smocking.  
It's a super simple method that also gives you some extra visual interest to the back. The smocking will work well with the ties and a buckle, or you can leave them off as I did.

You'll need some elastic thread - I'll be using Gutterman brand, tailors chalk/disappearing ink, an empty bobbin and the back pattern pieces of your Winifred dress. Before adding smocking to your dress you'll need to sew the CB seam, press and finish the edges.  On my example I've removed the CB seam by cutting the back on the fold.  This works well if you have wide 60" fabric.  Just be sure to remove the seam allowance from the pattern before cutting or your collar won't fit. 

1. Hand wind your bobbin with the elastic thread, putting a little bit of tension on it as you wind.  It won't take too long because the elastic thread has a thicker diameter.
2. Put regular thread in the top of your machine and set the stitch length a little longer than you usually use for seams. I've set my machine to a 3 stitch length.  
3. On your back dress, draw a line in chalk or disappearing ink between the two lower waist notches. Mark the beginnings and ends of the lines about 1" away from the edges.  This keeps the smocking out of your seam allowances when sewing up the side seams.
4. Stitch on top of the marked line, back stitching at the start and stop of the line. 
5. After completing the first line of stitching, you will use the edge of the presser foot as a guide to stitch the rest of the lines.  Each line of smocking will be 1/4" away from the other.
Pull the the fabric flat as you stitch another row to keep a uniform look.
6. Continue stitching the parallel lines of elastic thread until you've stitch up to or a little past the upper waist notch.  Once you are done trim the thread ends close to the fabric.
7. Set your iron on a high steam setting like cotton. If you have a steam burst button use that as well. Place the iron next to the smocked fabric, but not on it, and let the steam hit the elastic thread.  The steam will make the thread gather in to it's fullest extent. 
Give the smocking a few good steam bursts across the entire length of the back and let the fabric cool off.  Once it's cool you're ready to move on to the next construction step.

Heather.
SHARE:

Thursday 27 March 2014

The Winifred sew-along # 4 - Sewing time!


Howdy sew-alonger's!  Hopefully you're all making progress with all your fitting, pattern adjustments and  sewn up a worthy muslin/toile and are ready to start sewing?!  Because in today's post we are starting just that,  the fun part of  sewing up our Winifred dresses, yay!

Before we get started, below is a recap on the previous sew-along posts, in case you need to catch up or are just joining us:


OK let's get started on sewing up our Winifred dresses!


STITCH DRESS BACK

1. Right sides together, stitch the two halves of the dress (2) together at the center back seam.

2. Finish you seams and press it open.


ATTACH ELASTIC WAISTLINE 

1. On the inside of the dress measure your natural waistline across the dress back bodice only.


2.Take the back waistline measurement and add 2'' to it for the seam allowance. 
Then cut 1'' wide bias ( single fold) bias binding to this length.


3. On the wrong side of the dress lay the bias binding, wrong side down on the marked natural waistline. Pin into place making sure the bias binding is lined up with the dress side seams.


4. Stitch the bias binding in place along edge side edge ( top and bottom) and as close to the edge as you can. Leave both bias binding ends open.

You have just created a casing for the elastic to live in!


5. Cut a length of elastic 3/4 or 75% of your back dress waistline measurement, including 2'' for the seam allowance.


6. Attach a small safety pin to one end of the elastic and pull it through the bias binding casing, starting from either side. The elastic should fit nice and snugly into the bias binding casing but  make sure there are no twists as you pull it through.  

***Tip: Use a loop turner to latch into the safety pin on the elastic and pull it through.


7. Once the elastic has been inserted into the bias binding casing, hold both ends and stretch it out gently. This will get rid of any twists that may have formed. Also evenly spread the gathers along the back of the dress.  Secure both ends of the elastic in place along the dress seam allowance, remember to back stitch to keep the elastic secure, as it will take a lot of stress through wear and you don't want it popping out!


Last thing to do is trim the side seams of the elastic and bias binding and you're done for this sew-along post!

Tomorrow's sew-along post Heather will be showing you an alternative to the elastic and casing, on how to add smocking to the Winifred dress.

Until then happy Winifred dress sewing!

Don't forget to share your progress on the Facebook sew-along group, Twitter or Instagram using the hastag #winifred.

Abby
x

SHARE:
© Bluegingerdoll - Vintage inspired sewing patterns, sewing tips and tricks | All rights reserved.
Blogger Template Created by pipdig